Corgi
A 220mm miniquad designed to carry the GoPro Session.
As I've stated before, I fully expected Krieger, Mitsuko, and other symmetrical X quads to make H quads obsolete. Yet the one request I get more than any other was a 5" Tweaker. Having experienced the perfect flight characteristics and vastly higher speed of an X, why would anyone want to go back to an H?
As best as I can gather, when someone asks for a 5" Tweaker they're saying they want a worry-free basher, something that can land on any surface without damaging the battery. They're looking for something fun to fly, good enough to just hang in races but a blast to fly acro.
Now, I can whip up a 5" H quad no problem, but I refuse to make a 'land grab', staking out a piece of territory in a sea of lookalike frames to make a buck. There are already plenty of excellent 5" H's, so I stewed on the idea 'til I could come up with a concept that would actually improve the category.
While drawing up the (still unreleased) Odonata the thought hit me. Why not do the same for the GoPro Session? See, the problem with many H's, with the exception of Superbeast-style setups, is that they have weight distribution all backwards. The heavy stuff – HD cam, battery – ride on top at the extremities, while the light stuff – fpv gear, fc, pdb – ride in the middle, in line with the props, right at the COG. This makes the quad unbalanced and unresponsive. So let's reverse this and get it right, and see if we can make a basher 5" quad that protects its gear while also being more nimble and snappy.
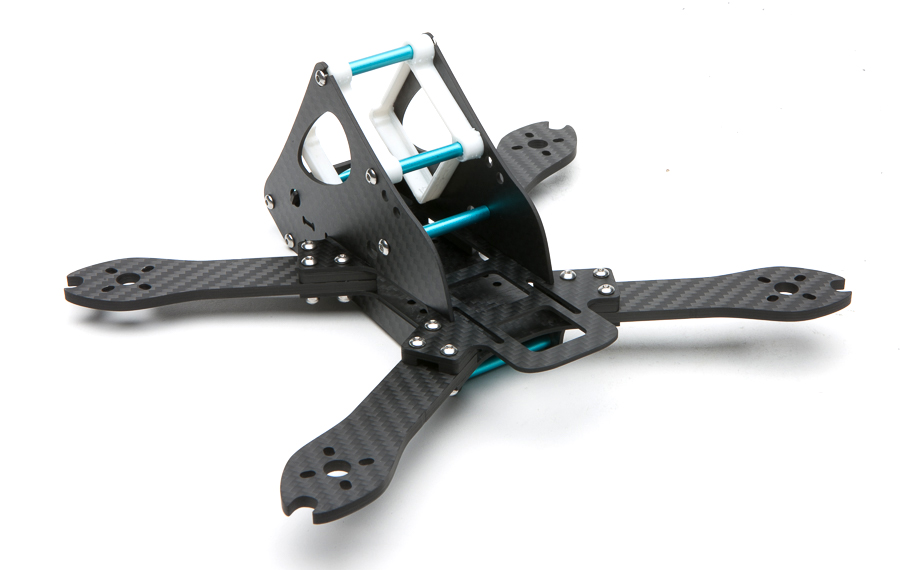
So the first thing to do is redistribute the components. Jam the two heaviest things, the Session and the battery, up against each other, as close to the COG as possible. The fc and pdb will be in tandem fore/aft instead of stacked, and they'll sit between the two lower plates. Like the Odonata, the fpv cam will ride up top, but instead of using a Krieger/Mitsuko style pod, the whole upper section will be two vertical plates that'll house the fpv parts up high. I started drawing and came up with this.

Oh no what have I done.
This was not what I had pictured in my mind at all! The same configuration looks fine on the Odonata, yet is ridiculous here. Maybe the fpv cam can go under the Session?


It's still more stubby than sleek, but at least now it has some charm, kinda ugly/sexy like an A-10 Warthog. The vtx is a bit exposed up top, and there'd be no way of keeping the antenna from rotating down into the props, so I moved it down between the Session and the battery. That spreads the weight out a little bit but it's a good compromise.


The side plates will be refined in Illustrator. The usual plates/standoffs construction is so two dimensional, so I tried to make this a little more 3d by blending the plates together as much as I could.
The Session is a funny little cam with few mounting points. For now I've simply added a 35 degree plate to attach the Session with rubber bands. I also added some holes in the middle plate for a 3d printed couch in case anyone wanted to design one.
Here's the first cut built up.

Pet hair in product shots is one of my specialties.


So, there's a few little issues here. I thought the rubber band mount would do for a few test flights, but it turned out to be much flimsier than expected. I thought of a 3d printed mount while walking my dog and I quickly returned home and drew it up.

I showed it to Will Dobbins of Twisted Quads and he had it printing before I even asked.

Not only that, he had the better idea of eliminating the center altogether and making it in two thin pieces. Now the print doesn't to span a gap to make those holes, and it'll be quicker and cheaper to make. So that's dogwalk, brain fart, design, print, revise, about three hours total. I wish everything was this fast.

There were other problems as well. Some were minor oversights, like how one of lower standoffs was too close to the nylon bolt heads for the FC. One problem, however, was pretty big. The side plates have to slip over the main assembly WITHOUT the front arms attached, which makes for a bass ackwards build sequence. And of course repairs would be a major PITA.
Build #1
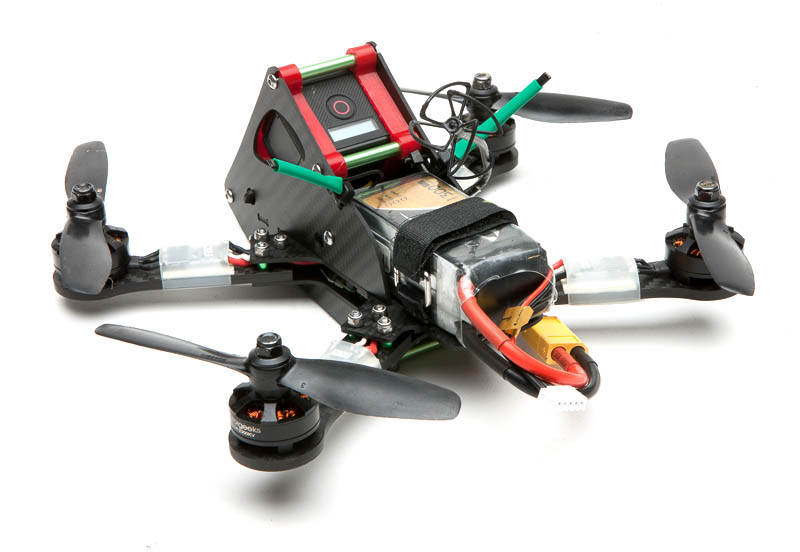
Wouldn't you know it, the frame that's impossible to crack open and maintain would turn out to be a cursed build. I built it with a Dodo, Kiss 24, and Rotorgeek 2204 2300. First hover inside and it was shaky as hell, the kind of shake that's indicative of something more fundamentally wrong than just PID tuning. I reflashed Betaflight a few times to no avail, so I opened the whole damn thing and replaced the Dodo. Same shake. I swapped the Kiss 24's for 18's and the shake went away (turns out I need to connect the ground on the Kiss 24's).
The would be maiden was scuppered by a vtx that died at the field, and the next attempt was cut short by an invisible sapling that snapped it out of the air and shredded the only antenna with a 90 degree elbow I had with me. Then bad weather and a blizzard kept me grounded.


V2
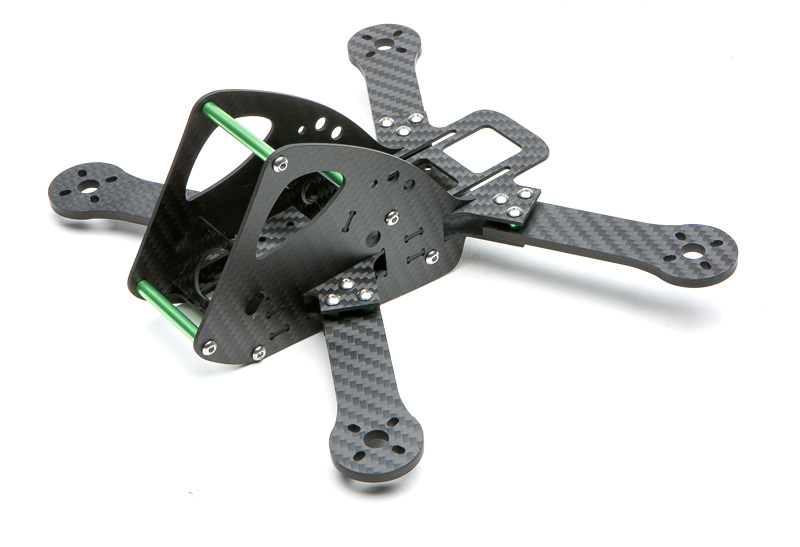
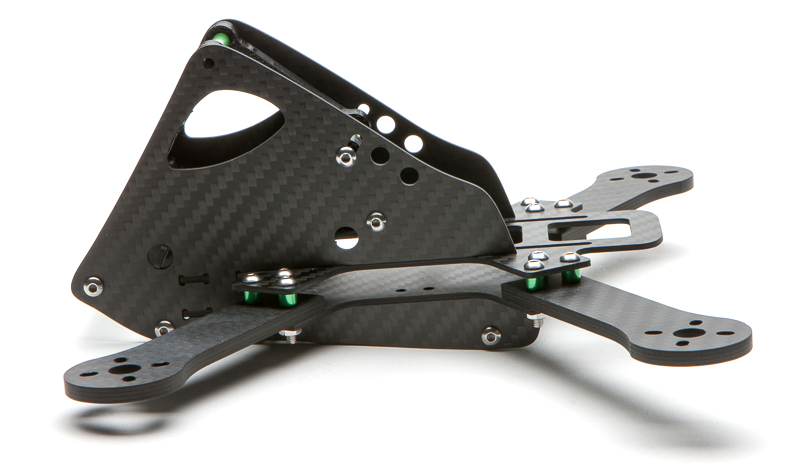
V1 was so dumb to build I asked Shane to hold off on assembling his while I redesigned it. I opened up the rear cutout of the vertical plates so that they can slide onto the main assembly with the arms installed. That means the vertical plates will only lock on in front of the arms, so we'll have to see if it's rigid enough.
Things were a little tight so I scooched things around a little to make some room.
My cam plates usually have a hook to oppose the clamping force from a standoff on the opposite side, but since this cam plate is surrounded by standoffs the hook isn't necessary.
I opened up the middle plate with more cutouts. Space is tight here and this should help with finding a home for the receiver.
Finally, I wasn't crazy about the curved top of V1 so I gave it a slightly stepped profile, similar to my second sketch, when the vtx was still above the battery.

A little bit of tilt built in for takeoff.
Ryan and Shane each built one up. Ryan described the sensation as being 'inside the ball' instead of outside, which is a great way verbalize the feeling of flying something with less rotational inertia and more centralized mass. Shane loved it as well but he drilled it into a tree and shattered both vertical plates and the top plate, so we'll have to crash it some more to see how strong it really is. Here's Ryan flying his, or at least until a motor flew off – he rushed his build and forgot to loctite the motor screws. Amazingly there was no damage in this crash on concrete.
As you can see the edges of the frame are blocked in superview. I thought it was the 3d print mount, but luckily Josh pointed out that it was probably the vertical plates of the frame. If he hadn't caught that I'd still be trimming the mount back until there was nothing but a thread left.
I finally got to open up my V1 build that Sunday at the club field. I hadn't flown in ages so I started out a bit gingerly, and by the time I felt comfortable the Session battery was dead (WTF Session!). I know the placebo effect is strong with subtle things like this, but it truly felt more centered and locked, nice and speedy. Here's one of the early flights while I was still getting acclimated, not fully tuned. The flight ends ignominiously when I see a Tweaker go by and try to get a side shot of it going through the gate, only to swing wide into the trees.
V3
I thought up the 3d printed cam mount after drawing up V1, so it was dropped in haphazardly. For V2 I merely tweaked the placement of the components based on how V1 built up. I decided that this was too half assed so I started over clean.
I re-drew the camera mount using Will's 2-piece concept, but with the front standoff moved to the top so I can make the front of the vertical plates flush with the Session and out of view.

Then I placed the components in Sketchup and established their mounting points.

As usual, the Sketchup drawing was imported to Illustrator. The holes and slots were kept while the outline was changed to guides, and a new outline is drawn. I changed the hole for the front of the cam mount to a slot, so that the camera can rotate up and be removed by simply loosening the front screws instead of removing them completely.

The slot allows for a tiny bit of camera tilt adjustability, somewhere from 30-37 degrees. Space is way tighter here so it can't have the huge range of the Odonata's GoPro mount.


The Session's a little loose in the mount, so I redrew it with gussets.

Aside from that I'm thinking I'm really close here. It flies like a dream, super locked in and fast as hell.
Aaaaaand then Shane has to go and break his again.

Dammit I was so close!
V4
I had 3 4mm standoffs between the arms and the upper plate. After Shane's crash it seemed like that area needed some beefing up, so I changed it to a 4mm carbon filler. The piece has a routed out channel for the esc wires, and I moved the inner screw to the side so the wires could have a straight shot. The filler ends in line with the inside edge of the vertical pieces, so there's a continuous wall of carbon. While waiting for the new parts to arrive I did this to my V3 and it survived without a scratch (and the Session didn't eject!), so it's not as if the original design was that weak.
After a painfully long Chinese New Year break the parts finally arrived. I notched the ends of the arms in case someone wants to put bigger esc's underneath. One of the front standoffs was moved slightly to allow more fpv cam tilt. Here she is.


Here's my build, with Kiss 18's and Rotorgeek 2204 2300's, AUW 596 grams.


Here's Chris (Patient 0)'s build, using bigger ESC's under the arm and 3d printed arm guards to protect the motor wires. Chris also printed out skid guards for the side plates. All 3d printed accessories can be found here on Thingiverse.

I really like this arm guard. The motor wires run out and down, through the channel. Two motor screws pass through and bolt directly to the carbon arm, two hold the arm guard in place. This is only for larger esc's that wouldn't otherwise fit between the motor and the body.

As for the name, it's a tribute to my doggie girlfriend who used to get walked at East River Park, where we flew before we got arrested. She'd come sprinting from two fields away and pile into my lap like a landed fish. It was literally the most joy a human can experience.
And her long sprint sometimes resembled Lancelot's charge for comic timing:
Ben Small created the graphic for it:

Aaaand...that's that! Perhaps the best testament to the design is the fact that you can grab Corgi by a prop blade, and it will hang down absolutely straight – that means the COG runs right through the prop line. So you have your weight as centralized as possible, balanced on every axis, as nimble and as stable as can be. Preorder is live here, hope you'll enjoy it.