Archimedes
I get a lot of requests, but this one was hard to top. Nilsen Clif lives in Malta, where there's way more free airspace over water than land. He wanted a waterproof quad so they can race over water, and based on my work on Mifune, Camba, Rapture, and Micheru, he thought I'd be the guy to design the frame. This sounded difficult as hell so naturally I accepted.
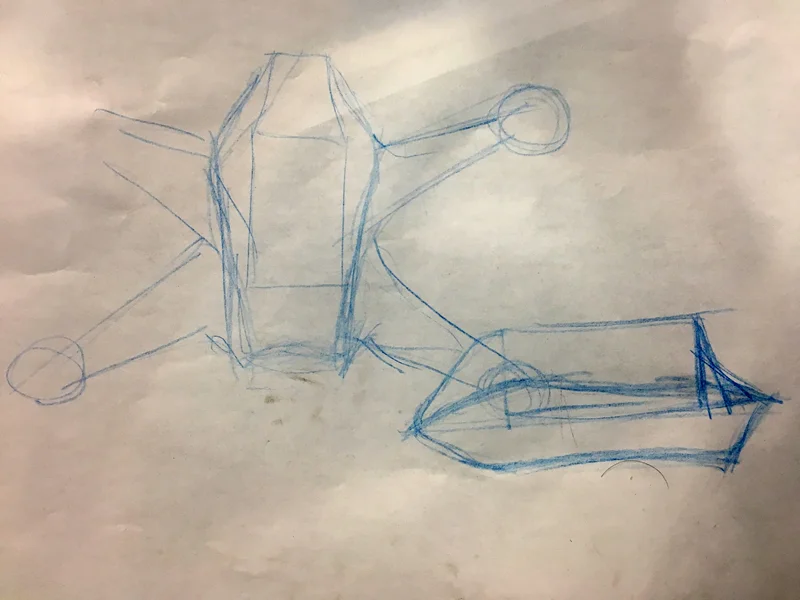
I spent a month or two just trying to lay out the frame. I figured it would have to be 3d printed, most likely an HP Fusion print. The battery bay would have to have some kind of a flange, with a gasket to make it watertight. I was having a hard time picturing how to get enough screws on there, so I imagined it with a big ol' strap around the whole thing to seal things up. I did a lot of Solidworks practice to figure how to model the shape and try to make it un-ugly, without much success (it's much easier to make a cool looking frame when the battery's not enclosed). Here's one of those attempts to illustrate my struggles:

I really believe that form should follow function, but I'm also painfully aware that no one wants an ugly frame. And in this case, if you wrap all the parts as cleanly as you can, you get something pretty ugly, and I just couldn't see a way around it.
In the meantime I ordered a Micheru in HP Fusion. I struggled to get Micheru to fly with Nylon X, but I'm a glutton for punishment so I gave it another shot. I was able to make the Fusion frame fly by dialing d way down, or maybe it was the nice bobbins on the Furious Fortini. It wasn't ideal but at least it was viable, but for one thing: the print alone was well over $200.
Breakthrough #1
I was stuck for another month or so 'til Nilsen suggested going with a carbon baseplate and sealing things with gaskets. With a solid carbon base I could print the rest of the frame with Taulman 645 nylon, and break it up into smaller pieces.
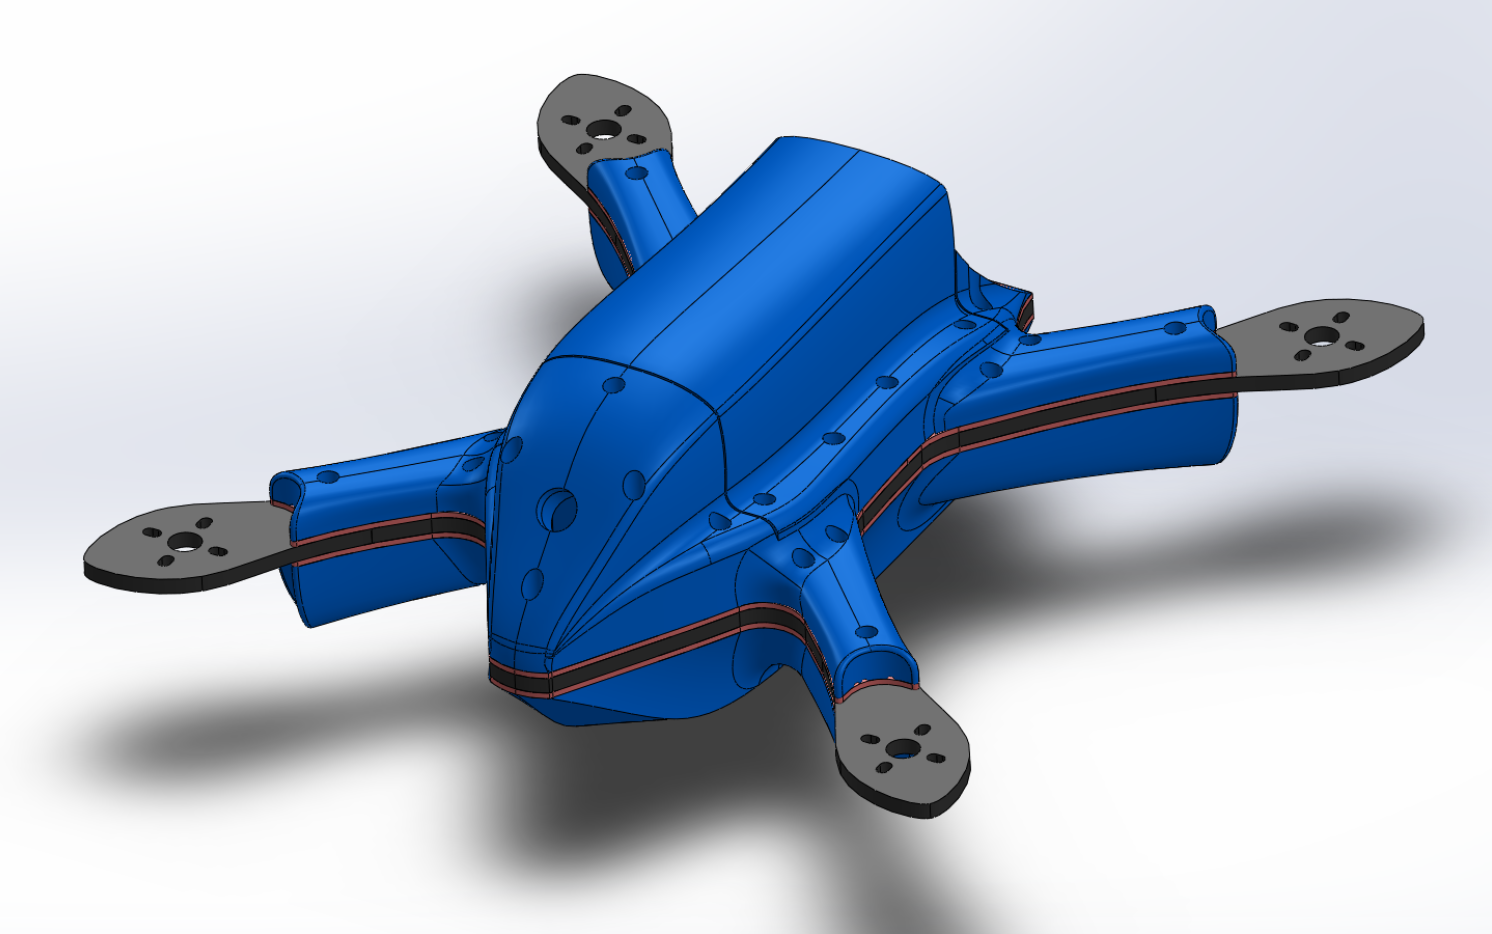
After much thought I came up with this arrangement: motor leads will cross over under the frame through holes in the arms. The FC stack will attach under the carbon baseplate in a hull section. The upper section will be divided into a nose, battery bay, and tail. The upper and lower pods will screw together through the carbon, squeezing against gaskets above and below. A 6" frame would be too big for my printers, so I imagined it would be a 5" frame running 5s to deal with the weight of all the pods.
There was another issue I hadn't thought of earlier. The props have to be above the waterline, which means there'd have to be quite a bit of volume down below. A quick Google and I learned that to make a gram float you have to displace a gram, or a cubic centimeter, of water. Duh, makes perfect sense. That meant there would have to be some 6-700 cc's below the props. That's way chunkier than what I'd been drawing.
I'd learned from Camba that there's way more to a battery bay than enclosing the battery. The power leads take up a surprising amount of space, and you have to be able to plug the battery in, tuck away the leads, and slide in the bay. And to top it off, I still haven't figured out how to cinch it all down tightly enough to be waterproof. I finally realized that a shoulder on the sides of the bay would provide space for a row of screws, with the added benefit of widening the fuselage so there'd be more displacement down below.
So the plan was to create the shape, split it in half, and shove a piece of carbon in between. I was excited to finally make a frame that was fully 3d all around, but wasn't happy that the straight extruded profile of the carbon baseplate broke up the flow of the lines. Dammit, so close.
The battery bay is the most important part, so I started there.

Next, a couple more surfaces defined the nose.

Couple more surfaces make the shoulder.

Might as well shape the hull like a boat.

Then a simple tail.

Next, half an arm.

Which is mirrored to make a whole arm, then mirrored again to make the rear arm.

Then it's all joined, shelled, and filleted. Mounting holes are laid out.


Next, it's chopped into pieces, the nose, battery bay, tail, and hull. Each is finished separately. I'd been experimenting with embedding parts inside prints, and this was a perfect opportunity to embed nuts inside the hull to clean things up and ease assembly.

The parts have to be perfectly flat at the bottom for a good seal. The tabs help keep the edges from curling while it prints. A micro cam will be glued in, hope the lens is waterproof...

Here's a closeup of the hull, you can see where the nuts will be embedded in the print.

Here's the carbon. Motor wires cross from above to below through slots in the arms. Look how chunky!

The upper gasket. Note that the arms, nose, battery bay, and tail all form separate watertight compartments.
And here it is all together.
Assembling this thing is going to be a bit of a challenge, what with two floppy gaskets to line up perfectly.
I was really pleased that its shape reminded me of one of my favorite childhood toys, the Thunderbirds mother ship. The lines of that thing are permanently etched in my brain.

I started printing up parts and ordering carbon. I've never done anything in rubber but I figured laser cut silicone would work. I sent the two gasket drawings to Ponoko, and got a quote of...$64 each!
Breakthrough #2
So, back to the drawing board. As I looked around for other options it dawned on me that I could print the gaskets myself with Ninjaflex. Then as I thought about it more, I realized that I could embed the carbon between the two gaskets, like the 3d Shrieker. And with the print wrapped around the perimeter of the carbon, my flowing lines wouldn't be interrupted by the purely vertical extrusion of the carbon plate! Time to start all over again. And most importantly, wrapping the carbon inside the gasket eliminates 2 potential entry points for water.
Such nice prints, going to waste.
It's disheartening to revert to square one but you learn so much with each redraw that the end result really benefits from iterations. Printing the pieces helped me better visualize the pressure each screw would exert, so I moved them to more sensible locations. The previous hull only displaced about 500 cc's, so I made the next one a bit bigger. I also extended the lower arm fairings (the upper fairings have to be shorter so motor wires can spread out and fit into grooves underneath). Other than that it was pretty similar, with the biggest difference being the 3d printed gasket which wrapped around the baseplate.

Sadly this part's just a bit too big for my printer, so the tips of the arms will have to be printed separately.


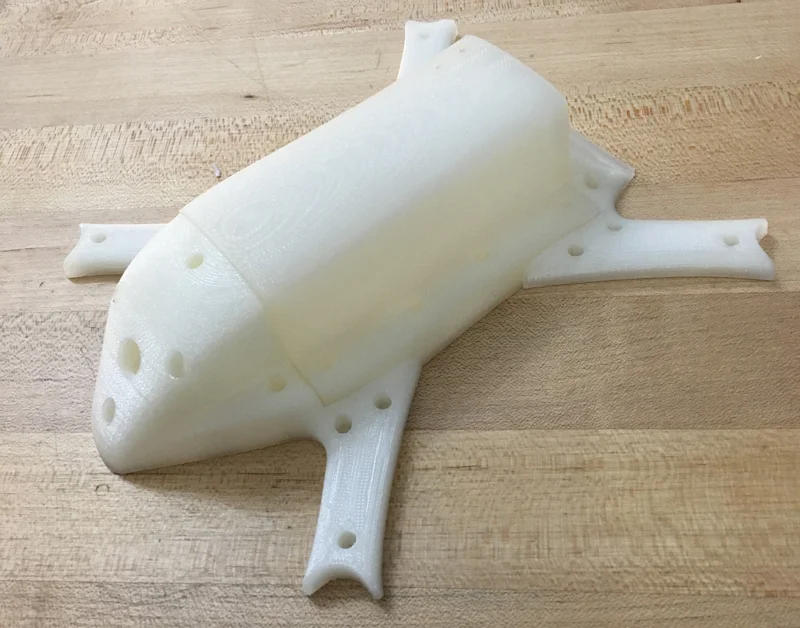
With the carbon ordered and on the way, I started printing the other parts. This was my third try at printing the tops, so I had those pretty dialed. That left the big one, the one piece hull. Not only is it huge, it's also a relatively flat enclosure, which means the entire interior is filled with supports. I'd extended the fairings to maximize its volume (so the quad will float higher), but it got bigger than my print bed so I had to dial it back a touch. And finally, the print has to be paused at 5mm and 25 (!) nuts inserted.
I started the print late at night, thinking it'd quickly hit 5mm, I'd insert the nuts, and then go to bed. Turns out it took about 3 1/2 hours to get there.

There's the tabs doing their job. The one on the left was starting to lift so I added a clip. Look at all that support (I screwed up, the arms don't need any).

The nuts are in and safely ensconced. The nozzle knocked one out and I had to reinsert it as the print was running (that's why there's an extra nut sitting up top). If I hadn't caught it the whole part would've been ruined. Off to bed at 5am.
The monster print finally finished and I did a dry fit of the printed parts and awaited the arrival of the carbon plate.

There was a considerable amount of drag on the screws within the prints, so I ordered some socket head screws to replace the button heads, 'cause it would be catastrophic to have a stripped screw head on any of the parts.
There was another, more serious problem: the parts were way heavier than I anticipated. I dropped the hull in a pan of water and it sat way lower than my calculations predicted. At this rate the props might be underwater, assuming the whole thing floated at all.
I ordered some Ninjaflex while waiting for the carbon to arrive. It's a little more elastic than my go-to TPU Sainsmart, so it should function better as a gasket. The carbon arrived a few days later and I fired up the gasket print. The super soft Ninjaflex filament was incredibly finicky on such a large print, and after five or six tries I gave up and reverted to Sainsmart. The print paused at the designated height and I dropped in the carbon, and resumed the print.

When the print finished I realized that there was a shift on the y axis so the part wasn't properly sealed. I cut the carbon out and tried again, figuring I must've bumped the print while inserting the carbon. The same shift happened each time, even if I manually zero'd the head while it was paused. I finally gave up on sealing the carbon inside the gasket and printed it as two separate pieces. It should still function just as well as a gasket, it'd just be less elegant as a part.
I assembled it with the two-piece gasket and was finally able to see the design IRL. And while it was super gratifying to see such a complex design come together, there was no avoiding the fact that, at 380 grams, the bare frame was already 70g heavier than a fully built Flaco!

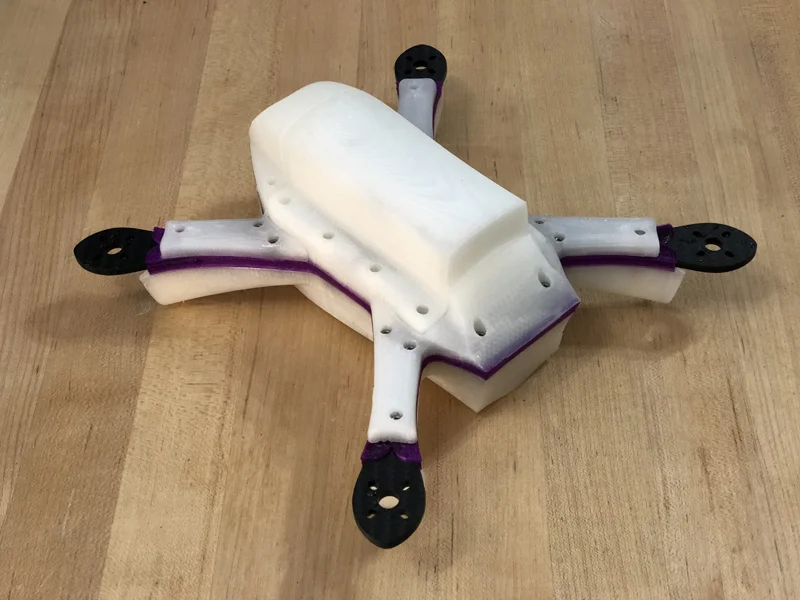
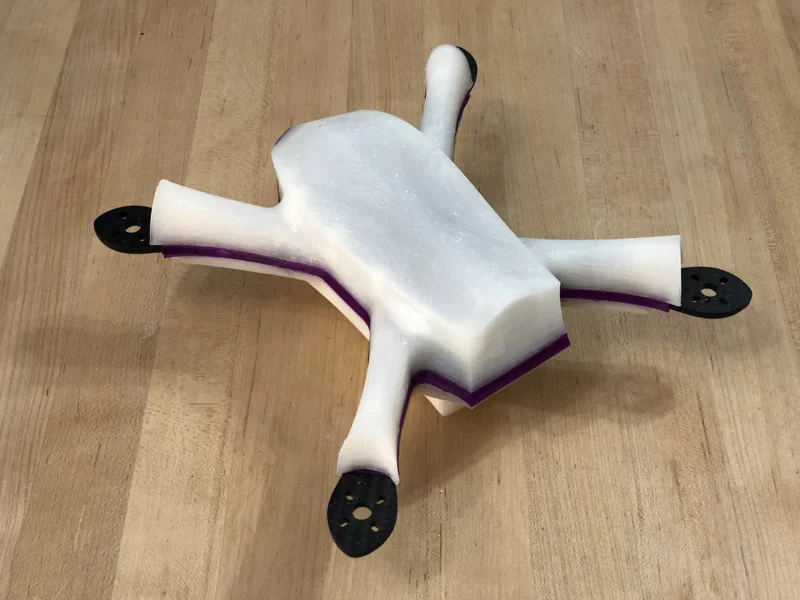
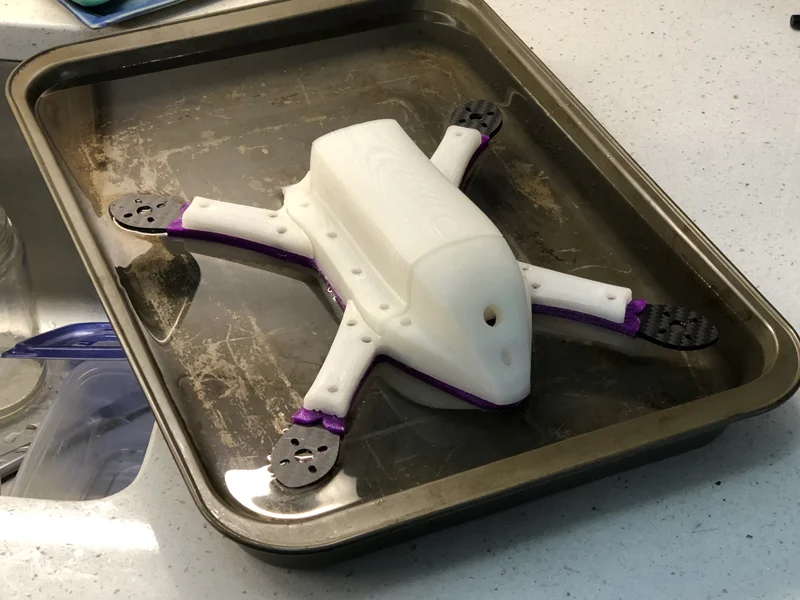
Assembling the frame, the screws took many turns to bottom out after initial resistance, an indication that the TPU gasket was compressing. That's a good sign, given the imperfect 3d printed interface of the pods. Some of the screws, however, kept spinning and spinning, indicating that the embedded nuts were spinning in place. I dropped it in a pan of water and it floated flush with the carbon, taking on water instantly. What's worse, the nylon absorbed the moisture and the whole frame gained 40 g.
Reality Check
People have made floating drones with Tupperware and a couple sticks. I hate to quit, but it’s painfully clear that I massively underestimated the challenge of waterproofing. After all my time and effort I was still way behind a simple two dollar 20 gram food container, so for now the tail’s going between the legs.